Showing posts with label Visual Studio. Show all posts

Thursday, April 21, 2016

Could Not Find 'Xamarin.iOS'

Error: Could Not Find 'Xamarin.iOS'

You will get this error while building your xamarin ios/iphone/ipad project in visual studio.
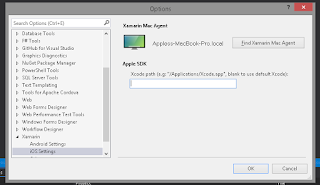
To build ios apps in visual studio you need xamarin installed (at least xamarin.ios) on a mac machine in same network and link to that machine in visual studio.
you can link mac machine (xamarin installed on that) in visual studio from tools menu -> options
Compiled by: Dr. Rajesh Rolen
Read More

Friday, January 7, 2011

what is the name of the iis process in windows 7 or I am not able to find IIS process in windows 7

if you are using visual studio in windows 7 and you wants to attach your asp.net code with worker process "w3wp.exe". follow below steps.

press: ctrl + alt + P
you will not able to find this process directly there so to get that process in list you will have to check the check box "Show processes in all sessions".
now if you not started your visual studio with admin rights then it will ask you to save and restart visual studio with admin rights. click it and it will restart visual studio with admin right and its done.
now again press: ctrl + alt + P and check checkBOx "Show processes in all sessions" and you can now view "w3wp.exe" process. so just select it and attach..


Solution By: Rajesh Rolen
Read More

Thursday, January 6, 2011

HTTP Error 500.23 - Internal Server Error An ASP.NET setting has been detected that does not apply in Integrated managed pipeline mode.

HTTP Error 500.23 - Internal Server Error
An ASP.NET setting has been detected that does not apply in Integrated managed pipeline mode.

You gets this error mostly in windows 7 when you wants to run you web site using virtual directory on IIS.

This solution is :Open IIS manager, and go to the Application Pool for your site.
Change the properties of the application pool from "Integrated" to "Classic".

Solution By: Rajesh Rolen
Read More

Wednesday, December 8, 2010

How to show immediate window.

Some times in visual studio the immediate window gets disappeared.
to get it just press: ctrl+alt+I and its done..

Solution by

Rajesh Rolen

Read More

Friday, September 17, 2010

Determine which columns have been modified as a result of an UPDATE operation

we can Determine which columns have been modified as a result of an UPDATE operation using CLR Triggers, this is its one of unique capabilities.

Unique Capabilities of CLR Triggers


Triggers written in Transact-SQL have the capability of determining which columns from the firing view or table have been updated by using the UPDATE(column) and COLUMNS_UPDATED() functions.

Triggers written in a CLR language differ from other CLR integration objects in several significant ways. CLR triggers can:

*Reference data in the INSERTED and DELETED tables
*Determine which columns have been modified as a result of an UPDATE operation
*Access information about database objects affected by the execution of DDL statements.

These capabilities are provided inherently in the query language, or by the SqlTriggerContext class.


Determining Updated Columns

You can determine the number of columns that were modified by an UPDATE operation by using the ColumnCount property of the SqlTriggerContext object. You can use the IsUpdatedColumn method, which takes the column ordinal as an input parameter, to determine whether the column was updated. A True value indicates that the column has been updated.

For example, this code snippet (from the EmailAudit trigger later in this topic) lists all of the columns updated:

C#

reader = command.ExecuteReader();
reader.Read();
for (int columnNumber = 0; columnNumber < triggContext.ColumnCount; columnNumber++)
{
pipe.Send("Updated column "
+ reader.GetName(columnNumber) + "? "
+ triggContext.IsUpdatedColumn(columnNumber).ToString());
}

reader.Close();

Visual Basic


reader = command.ExecuteReader()
reader.Read()
Dim columnNumber As Integer

For columnNumber=0 To triggContext.ColumnCount-1

pipe.Send("Updated column " & reader.GetName(columnNumber) & _
"? " & triggContext.IsUpdatedColumn(columnNumber).ToString() )

Next

reader.Close()


Reference:http://msdn.microsoft.com/en-us/library/ms131093.aspx
Read More

Monday, August 16, 2010

Not able to open Server Explorer in VS2008

if you not able to open server Explorer in vs2008 you can perform below step to make it open:
Go to visual studio command prompt
run below command:
devenv /setup

and its done....

you can use "devenv /resetsettings" command to reset all settings of visual studio
Read More

Sunday, August 30, 2009

Master the Command Window

Visual Studio has hundreds of menus, windows, and dialog boxes. This you are probably aware of; what you
may not be aware of is that you can avoid using all of these and use the command line inside the command
window instead. This hack looks at some of the different commands available to you, how to use existing aliases,
and how to create and manage your own aliases.

So why would you want to use a command window when you could just use some part of the IDE? Using the
command window is sometimes faster than using the IDE, and when you are writing code with both of your
hands on the keyboard, it is often easier and faster to type a command than to reach for the mouse. Many people
who are used to the good old days of the command prompt find themselves right at home with the command
window, but whether or not you are one of these people, I encourage you to explore its functionality.
The main keystroke to remember is Ctrl-Alt-A (View.CommandWindow); this is the shortcut to open the
command window.
The open command is the first command I am going to cover. Using the open command, you can open any file
in either the filesystem or the current solution. (I think the real added value here is opening a file in the current
solution, since the command window provides IntelliSense.) Figure shows the command window and the
IntelliSense available for the open command.


This might not seem like much, but if you have a dozen projects with hundreds of files, this becomes much faster
than digging through the Solution Explorer with your mouse.
You can use any Visual Studio command directly through the command window (through this book, whenever we
mention a keyboard shortcut, we've also been mentioning the command). Any command can be used through
the command window.
Twenty of the most useful commands are shown in Table . You can either type the full command or use the
alias.


When in doubt, you can sometimes fall back on old MS-DOS command prompt habits: for instance, the
command cls will clear the command window. You can find a complete list of commands in the Tools
Options Keyboard screen
Read More

Start Visual Studio from RUN

We can start visual studio from RUN by following steps:-
1. click start menu. (or press window key + R and go to step 3)
2. click on RUN.
3. type DEVENV in RUN and press ok or hit enter.

we can use this to improve speed of opening visual studio by following steps:-

* in above steps type "devenv /nosplash" instead of only DEVENV. this will open visual studio without its splash screen. and without splash screen it will be opened fast.
Read More

Turn Off Dynamic Help

By Turn off dynamic help we can improve speed of visual studio.
Another issue that Visual Studio .NET helped to resolve was Dynamic Help starting during startup.
Dynamic Help is another part of Visual Studio that tends to slow everything down. It is a good idea to make sure
the Dynamic Help window is not open when you start up Visual Studio—this is done by simply making sure the
window is closed when you close Visual Studio.
If you never really use Dynamic Help, you can disable it completely. To do this, you need to delve into the
registry and change the value of the key located here:
HKEY_CURRENT_USER\Software\Microsoft\Visual Studio\<7.1>\Dynamic Help
The name of the key is Never Show DH on F1, and you will need to change the value of this key to YES. Doing
this will disable Dynamic Help.
Read More

Disable the Start Page of Visual Studio

We can disable the start page of visual studio. its a one of the tricks which is used to improve the speed of visual studio.

The start page is the web page that is displayed by default when Visual Studio first starts up. By default, this
page shows a list of recent projects and includes tabs that list online resources and allow you to edit your Visual
Studio profile. The start page does not really add any functionality that you can't access somewhere else. The
reason the start page is both a security threat and a slowdown factor is that it launches Internet Explorer. Visual
Studio .NET 2003 fixes this issue slightly by loading Internet Explorer only if you are using a customized start
page, so needless to say, using a customized start page is discouraged.

If you don't get a lot of use out of the start page, it is easily disabled in the Options menu. While the performance
gain won't be the same between Visual Studio editions, it will be enough to be worth the effort. To disable the
start page, simply go to Tools Options, then choose General under the Environment folder (General should
be selected by default). On the right of that screen, you will see a drop-down where you can specify what Visual
Studio should do on startup. I recommend choosing Show Empty Environment; this means Visual Studio will not do anything special on startup.
Read More

Thursday, August 27, 2009

Master IntelliSense

Visual Studio can read your mind. Learn how to have Visual Studio's IntelliSense feature do lots of the
typing for you.
Even if you have used Visual Studio only a couple times, I am sure you have noticed one of its trademark
features: IntelliSense. The most popular form of IntelliSense assists you as you code by providing a list of the
members for each class immediately after you finish typing the class name (and the following period). This is not
the only form of IntelliSense though; this feature finds its way into a multitude of different areas of Visual Studio.

Complete Word
The first, and most useful, IntelliSense feature is actually just a shortcut: Ctrl-Space (Edit.CompleteWord).
By using the Ctrl-Space shortcut, you can summon IntelliSense at any point during your coding session, not just
when you finish typing a class name. This is one of the few shortcuts that can really change the way that you
write code.
If you have already starting typing when you press Ctrl-Space, Visual Studio will take one of two actions. If there
is only one object that matches what you have typed in so far, it will automatically complete the object name; for
instance, if you typed in HttpR, it would automatically complete the rest of the object name (HttpRequest). If
there are a number of objects that match what you have typed in, it will display the full list of members with the
first match highlighted. Figure shows what the listbox would look like if you only typed in the letter P.


You can also press Ctrl-Space on a blank line and be shown a complete list of members in the current context.
This is a great way to find a variable name that has slipped your mind. Figure shows an example of this.


This shortcut can be even more useful if you name all of your private member variables with a common prefix; for
instance, if all of your variables are prefixed with "_", by typing _ and then pressing Ctrl-Space, you would display
a list of all of your variables to choose from.
Read More

Block Selection

Normal text selection is done on a line-by-line basis; it is impossible to select parts of multiple lines with
normal text selection. Figure shows how it is not possible to select just the right side of the equals sign using
normal text selection. This is a drawback that most of us have become accustomed to.


Visual Studio has a feature that allows you to get around this limitation. By holding the Alt key while selecting
text, you trigger block selection, which allows you to select text regardless of what line it is on. Figure shows
how block selection can be used to select only text to the right of the equals sign.


Block selection can be used to select any amount of text in a block, as opposed to line by line. You can use block
selection whether you select text with the mouse or the keyboard (hold down Alt and Shift, and press the arrow
keys to perform a block selection with the keyboard).
When pasting block selections, Visual Studio will insert each line of the block onto a subsequent existing line,
unlike normal selections where new lines will be inserted. Thus, it is important to be sure that the destination for
your block selection is the same number of lines as the source.
Read More

Line-Based Cut and Paste

The clipboard ring is not the only copy and paste feature in Visual Studio; a number of shortcut keys allow you
to copy and paste code even faster.
Most applications rely on you selecting which text you want to cut, copy, or delete. Visual Studio makes the very
simple assumption that if you have not selected any text that you want to cut, copy, or delete, the editing action

will be performed on the entire current line. If you wanted to move one line below another line, you could move
the cursor to the first line, press Ctrl-X (Edit.Cut) to cut the line, press the down arrow to move to the next line
down, and then press Ctrl-V (Edit.Paste) to paste the entire line. Other shortcuts like Ctrl-C (Edit.Copy) and
Ctrl-L (Edit.LineCut) follow this same rule and allow you to copy or delete the current line by simply pressing the
shortcut keys without selecting any text. Any time you can avoid reaching for the mouse to select text is time
saved.
Read More

Clipboard Ring

When you copy and paste text in any application, you are usually limited to copying and pasting one item at a
time. If you want to copy two separate sentences, you have to copy the first one, paste it, then come back and
repeat this for the next sentence. This can become tedious when you have 10 different things to copy and they
reside in 10 different places in the document. You end up switching back and forth between the two documents
10 times, once for each sentence you want to copy.
The clipboard ring eliminates this limitation. The clipboard ring allows you to cut or copy up to 20 selections and
access them using a keyboard shortcut. Here is the process for using the clipboard ring:
Copy (Ctrl-C, Edit.Copy) or Cut (Ctrl-X, Edit.Cut) up to 20 text selections, one after the other.
These selections are organized as a last-in-first-out (LIFO) stack. That is, the last item you cut or copy
will be the top item on the clipboard ring.
1.
Press Ctrl-Shift-V to paste the first selection (the item on the top) from the clipboard ring into your
document.
2.
If you don't want to paste the first selection, press Ctrl-Shift-V (Edit.CycleClipboardRing) again, and the
first thing you pasted will be replaced with the next selection from the clipboard ring. For example, if you
wanted to paste the fourth item in the clipboard ring, you would simply press Ctrl-Shift-V four times. If you want to paste the same item more than once, simply pressing Ctrl-V (Edit.Paste) after the first
time will work, since it will now be the current item on the clipboard.
Instead of moving between two documents a number of times, copying and pasting different selections, you can
first copy all of the selections from the first document, then go to the second document and, using the clipboard
ring, paste all of those selections. The clipboard ring also comes in handy when you have two or more separate
things that you need to paste multiple times; using the clipboard ring, you can switch back and forth between
these items easily.
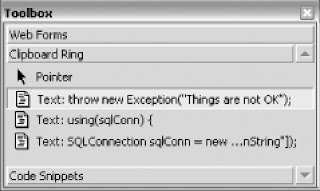


While the Clipboard Ring tab is a good way to get a better understanding of the clipboard ring, it is not as efficient
as the shortcut keys. Visual Studio .NET 2003 users will find that the Clipboard Ring tab is absent in Visual
Studio 2005, so it is best to use the shortcut keys instead of the Toolbox tab.
You can also view the current contents of the clipboard ring by selecting the Clipboard Ring tab in the Toolbox
dialog. This tab, shown in Figure , displays all of the selections currently living in the clipboard ring and allows
you to drag the selections to paste them into your document.
Read More
Powered By Blogger · Designed By Seo Blogger Templates